Replacing Waterlogged Flotation Foam at Haul-Out: A Complete Pour Foam Guide

24 July 2026
Haul-out season is the best time to tackle one of the most overlooked maintenance jobs on any boat: boat flotation foam replacement. If your hull feels heavier than it used to, your bilge pump runs more than normal, or you've noticed your boat sitting lower in the water, waterlogged boat foam could be the culprit. Old, saturated flotation foam does not just lose its buoyancy -- it quietly adds hundreds of pounds of dead weight and can accelerate hull rot if left unchecked. We have pulled saturated foam from 16-foot aluminum fishing boats that was holding more than 200 pounds of water. Replacing it with modern closed-cell pour foam is a DIY-friendly project you can knock out during a single haul-out weekend if you plan it right.
What this job needs
Everything below is in stock and ships from our Florida shop.


Why Waterlogged Boat Foam Is a Bigger Problem Than You Think
Most boats built before the mid-2000s used open-cell or low-grade foam that was factory-installed and never meant to last forever. Over years of bilge water exposure, freeze-thaw cycles, and fuel spills, that foam soaks up moisture like a sponge. A single cubic foot of saturated foam can hold over 50 pounds of water. On a 16-foot aluminum or fiberglass boat with several cubic feet of flotation cavity, that adds up fast.
Beyond weight, waterlogged boat foam creates a persistently wet environment against your hull -- exactly the conditions that breed osmotic blistering in fiberglass and corrosion in aluminum. It also makes a perfect home for mold and odors that no amount of bilge cleaner will fix permanently. If you are smelling mustiness below deck that will not quit, wet foam is almost always a contributing factor.
The fix is straightforward: remove the old foam, let the cavity dry completely, and pour in fresh closed-cell foam that actually resists water absorption. Here is how to do it properly.
Step 1 -- Assess the Damage Before You Start Cutting
Before ordering materials, probe your flotation cavities to understand how much foam you are dealing with and in what condition. On most runabouts and aluminum fishing boats, foam is packed under casting decks, inside side pockets, and beneath the floor stringers. On a pontoon, the logs themselves may contain foam.
Tap the hull with a rubber mallet in sections where foam should be present. A solid, slightly dead thud usually means foam is still there but may be saturated. A hollow ring means the foam has either degraded into crumble or was never fully poured to begin with. For fiberglass boats, weigh the hull on a trailer scale if you can -- manufacturers often publish dry hull weights, and anything significantly over that number points to moisture retention.
For pontoon foam replacement specifically, check the end caps and any access ports on the logs for water pooling. A small hand pump or shop vac can sometimes pull surprising amounts of water from a compromised log cavity. Customers ask us all the time why their pontoon feels sluggish off the plane -- nine times out of ten, waterlogged logs are the answer.
Step 2 -- Remove the Old Foam Completely
This is the messy part. Old foam typically has to be chiseled, scraped, or cut out in chunks. A reciprocating saw with a long blade works well for breaking up large sections. Wear gloves and a dust mask -- degraded foam is crumbly and irritating. If you are also dealing with a damaged sole during this process, our complete PPE guide for boat repair covers the protective equipment you should have on hand. The goal is to expose bare hull surface so it can dry and so the new pour foam can bond directly to it.
Once the cavity is cleared, let it air out for at least 48 hours -- longer if the weather is humid. If you are working in a covered boatyard, use a small fan to move air through the cavity. Moisture trapped under new foam is one of the most common mistakes we see DIYers make, and it will undermine your results from day one. Wipe down the bare surfaces with acetone or isopropyl alcohol to remove any residue before pouring.
Step 3 -- Choose the Right Pour Foam for Your Project
Not all pour foam products are the same, and picking the right one matters more than most guides let on. The two key specs to understand are density and closed-cell percentage. For flotation applications, you want a 2 lb/ft³ density closed-cell foam. Anything less dense floats fine in testing but degrades faster and absorbs more moisture over time.
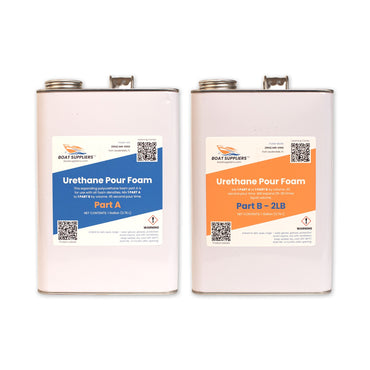
For smaller cavities -- like the bow pocket on an aluminum fishing boat or side chambers on a ski boat -- the Boat Suppliers Urethane Pour Foam is a solid starting point. It is a two-part rigid expanding foam that mixes 1:1 by volume (Part A to Part B), bonds well to fiberglass, aluminum, and wood, and can be layered in multiple pours for deeper cavities. The 2-gallon kit fills approximately 2 cubic feet of cavity space at full expansion. One critical note: this product performs best when components are kept at 75°F to 85°F. Cold components expand less and cure slower, so if you are doing haul-out in October in a northern climate, warm the jugs indoors before mixing.
For larger jobs -- full floor replacement on a bass boat, pontoon log repacking, or cabin sole work -- we recommend the Hi-Bond 2-Part Urethane Pour Foam. This is a professional-grade closed-cell formulation with a 2 lb/ft³ density that also mixes 1:1 by volume. It is formulated to resist breakdown from fuel and oil contact, which matters in bilge areas where gas spills happen. The Hi-Bond kit yields more foam per dollar at larger volumes, and its closed-cell structure will not absorb water the way older open-cell foams do. Component temperatures for Hi-Bond should be held at 75°F to 85°F as well -- the same range as our standard urethane foam -- so the same warm-jug protocol applies.
Quick-Reference Spec Table
We put this table together so you can compare both products side by side without hunting through the prose above. Use it when you are standing in front of your boat with a mixing cup in your hand.
| Specification | Urethane Pour Foam | Hi-Bond 2-Part Urethane Pour Foam |
|---|---|---|
| Density | 2 lb/ft³ | 2 lb/ft³ |
| Mix Ratio (A:B by volume) | 1:1 | 1:1 |
| Expansion Ratio | Approx. 15x to 30x liquid volume | Approx. 15x to 30x liquid volume |
| Cream Time | Approx. 20 to 30 seconds | Approx. 20 to 30 seconds |
| Tack-Free Time | Approx. 10 to 15 minutes | Approx. 10 to 15 minutes |
| Full Cure Time | 24 hours minimum | 24 hours minimum |
| Usable Component Temp Range | 75°F to 85°F | 75°F to 85°F |
| Fuel and Oil Resistance | Standard | Enhanced (formulated for bilge exposure) |
| Approx. Kit Yield (2-gal kit) | Approx. 2 cubic feet | Higher yield per kit -- contact us for volume pricing |
Note: Cream time, tack-free time, and cure times are guidelines at 75°F to 85°F component temperature. Cooler conditions will extend all three. Always verify current product data sheets at time of purchase.
Step 4 -- Pour Technique That Actually Works
The biggest mistake first-timers make with pour foam flotation is overfilling the cavity in a single pour. Two-part urethane foam expands to roughly 15 to 30 times its liquid volume depending on temperature and formulation. If you seal a cavity and pour too much, you risk warping panels, blowing out foam blocks, or creating pressure on adjacent structures. In our shop we have seen factory hull panels pushed out of alignment by a single overloaded pour -- it is not a subtle problem.
Here is the correct approach:
- Pour in lifts. Fill each cavity in layers no more than 2 to 3 inches deep at a time. Let each lift reach tack-free stage (see the spec table above) before pouring the next one. This gives the foam room to expand without building excessive pressure.
- Leave vent paths. Drill small vent holes at the highest point of enclosed cavities. As foam rises and cures, air needs to escape. Block those holes after the pour is complete and fully cured.
- Work fast. Once you combine Part A and Part B, you have roughly 20 to 30 seconds before the foam starts to rise. Mix thoroughly but quickly -- undermixed foam cures unevenly and leaves soft, less buoyant sections.
- Control your temperature. Keep component temperatures between 75°F and 85°F for best results. Store the jugs in a heated area overnight before your pour day if the boatyard is cold.
Pontoon Foam Replacement: Special Considerations
Pontoon logs present a unique challenge because they are long, enclosed cylinders that often lack easy interior access. Many owners choose to drill a series of injection ports along the length of the log rather than cutting large access panels. Space ports every 12 to 18 inches, alternating slightly in height, and inject small quantities per port. This approach takes more time but preserves the structural integrity of the log skin. After curing, seal the ports with marine-grade rivets and sealant.
Always check local regulations and ABYC Standard F-8 (Flotation) before you finalize your fill quantities -- pontoons are subject to minimum foam volume requirements based on the weight of the boat and engine package. ABYC F-8 is the specific standard that governs flotation material performance and placement for recreational boats, and it is worth having a copy on hand if you are doing a full re-foam on a larger vessel.
After the Pour: Finishing and Testing
Once foam is fully cured -- allow 24 hours minimum before closing panels -- trim any overflow with a serrated knife or coarse saw. Cured urethane foam cuts cleanly and can be shaped to fit flush with your floor or panel surfaces. If you are applying a fiberglass skin or plywood floor over the top, both products can be coated with epoxy or polyester resin for boats without issue after a full cure.
Before you launch, do a simple float test if possible -- put the boat in still water and check the waterline against your known reference points. A successful foam replacement should restore your hull to close to its factory weight rating, with noticeably improved bow rise, fuel economy, and handling at speed.
Doing This at Scale? We Work With Trade Buyers
If you are a boatyard, marine contractor, or dealer pulling saturated foam from multiple boats every season, we offer a wholesale program built for exactly that kind of volume. We have worked with commercial accounts that go through 20 or more kits in a single haul-out season, and buying at trade pricing makes a real difference on a job that already has significant labor hours attached to it. Reach out to our team directly to ask about wholesale accounts, volume pricing tiers, and freight options for bulk pour foam orders.
The Bottom Line on Boat Flotation Foam Replacement
Waterlogged boat foam is a slow problem that becomes a serious one if ignored. We have seen boats come off the trailer carrying 300 or more pounds of water weight that their owners had written off as engine aging or prop pitch. Haul-out is the right time to address it because your hull is already out of the water, cavities are accessible, and you have time to let everything dry and cure before relaunch. With the right pour foam products and a methodical approach, you can recover that dead weight, reduce bilge moisture, and give your hull structure a dry foundation going into the next season. If your floor also needs attention while everything is exposed, our fiberglass boat floor replacement guide walks through that process start to finish.
Whether you are doing a small patch job or a full re-foam from stem to stern, check out our Urethane Pour Foam for everyday cavity fills or the Hi-Bond 2-Part Urethane Pour Foam for professional-scale work. Both are closed-cell, water-resistant, and ready to handle whatever your haul-out throws at them. And if you are buying for a yard or a fleet, contact us about our wholesale program before you place your first order.
Prev post

How to Build a Fiberglass Boat from a Mold: A Step-by-Step Guide for DIY Builders
Updated on 28 July 2026
Next post

DIY Fiberglass Canoe Build: A Complete Step-by-Step Guide From Mold to Water
Updated on 21 July 2026