Epoxy Resin Temperature and Humidity: Getting Conditions Right for Marine Work

07 April 2026
Environmental conditions are the variable most fabricators underestimate. You can nail your mix ratio, prep your substrate perfectly, and still end up with a soft, tacky, or delaminated repair because the temperature dropped overnight or the humidity spiked. This guide gives you the specific numbers and decision rules you need to work confidently with marine epoxy regardless of the season.
Why Epoxy Resin Temperature Controls Everything
Epoxy cures through an exothermic chemical reaction between resin and hardener. Temperature governs the speed of that reaction from both outside (ambient air) and inside (heat generated by the mix itself). Get the temperature wrong in either direction and you compromise the final cross-link density, which is the molecular structure that gives cured epoxy its strength and waterproofing.
In marine environments this matters more than in most trades. A poorly cured bond on a hull, deck, or structural laminate is exposed to constant immersion, flexing, and UV. A repair that tests soft on day two does not get better in the water.
The Optimal Window: 70°F to 85°F (21°C to 29°C)
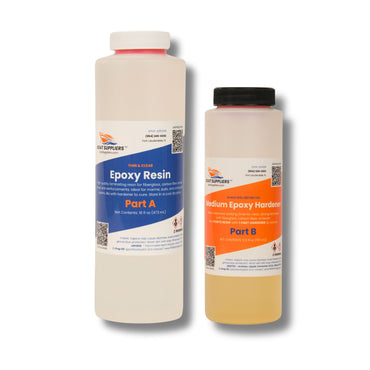
Most marine epoxy systems, including the Boat Suppliers Thin Epoxy Resin Kit used for lamination work, are formulated to perform reliably in this band. Within it you get:
- Predictable pot life matching the hardener label
- Viscosity low enough for thorough wet-out of fiberglass cloth
- Full cross-linking within the stated cure schedule
- Minimal amine blush risk
Above 85°F the pot life compresses fast. A 300g batch that gives you 25 minutes of working time at 75°F may kick in under 10 minutes at 95°F. You will also see micro-bubbling as trapped air expands before the resin gels.
Working with Epoxy in Cold Conditions
Below 65°F (18°C) the reaction slows and the resin thickens. Both problems compound each other: thicker resin is harder to wet out cloth with, traps more air, and penetrates less deeply into porous wood or rot-damaged substrate. The exothermic heat generated by the reacting mass is also reduced, which further slows cure.
Hard Minimum: 55°F (13°C)
Do not apply epoxy below 55°F. Below this threshold the chemistry stalls. The result is a surface that stays tacky indefinitely, never reaches working hardness, and provides no structural value. You cannot sand it, coat it, or trust it. Strip it and start over when conditions improve.
The 65°F to 70°F Marginal Zone
In this range you can work, but you need to make adjustments:
- Pre-warm your components. Store resin and hardener indoors at room temperature before mixing. Cold components mixed into a cold shop thicken before you can use them. Target 70°F to 75°F for the containers themselves, not just the air.
- Heat the substrate. A cold hull pulls heat out of the applied epoxy and slows the cure further. A heat lamp or propane torpedo heater aimed at the work surface (not the mixed resin) for 30 minutes before application helps significantly.
- Use a fast hardener. The Boat Suppliers Fast Epoxy Hardener (4:1 ratio) is designed to generate more exothermic heat and accelerate cross-linking, which partially compensates for a cool ambient. Note the 4:1 mix ratio carefully: four parts resin to one part hardener by volume. An off-ratio mix in cool weather produces an even slower and less complete cure.
- Keep the work area enclosed. A tarp tent over the repair site holds the heat you generate and blocks cold drafts that strip warmth from the surface.
Hot Weather: The Overlooked Problem
Fabricators in the southeast and Gulf Coast states deal with the opposite problem for six months of the year. Above 90°F ambient, even a slow hardener can produce pot lives under 15 minutes for any batch larger than 100g. Large lamination jobs become a race you cannot win.
Practical solutions for summer work:
- Start before 8 AM and stop by noon
- Mix smaller batches, 150g to 200g maximum, and pour immediately into a roller tray to spread the exothermic mass
- Keep resin and hardener in a cooler until the moment you mix
- Switch to the Boat Suppliers Slow Epoxy Hardener (2:1 ratio) for any job requiring more than a few minutes of working time
The slow hardener at a 2:1 ratio (two parts resin to one part hardener by volume) is the right call for large laminations, complex bonding jobs, or any situation where you need time to position parts, wet out multiple layers, or work on a curved surface that demands careful roller work.
Choosing the Right Hardener Before You Mix
This is the decision that most affects your outcome in variable conditions. Here is a straightforward selection guide:
Fast Hardener: 4:1 Ratio
Use the Fast Epoxy Hardener when:
- Ambient temperature is below 70°F and you need the exothermic boost
- The repair is small (less than two square feet) and you need it to cure quickly
- You are doing multiple thin coats with short recoat windows
Avoid it above 85°F or for any batch over 200g in warm conditions.
Slow Hardener: 2:1 Ratio
Use the Slow Epoxy Hardener when:
- Temperature is above 80°F
- The layup is large or complex and demands extended working time
- You are wetting out multiple layers of cloth in a single session
- You are bonding structural parts that need repositioning time
Thin vs. Thick Resin: A Separate but Related Decision
Temperature affects viscosity, and viscosity determines which base resin to reach for. The Thin Epoxy Resin Kit has a syrup-like consistency that flows readily into fiberglass cloth, making it the right choice for lamination work where wet-out speed matters. In cold conditions its viscosity is manageable with pre-warming.
For bonding, gap-filling, or coating vertical surfaces, the Thick Epoxy Resin Kit (1:1 bonding and coating) is a no-sag formula that stays where you put it. On a vertical transom repair or a tabbing job on a bulkhead, the thick formula does not run before it gels. Note the 1:1 mix ratio on this system.
Use our resin calculator to estimate how much material you need before you mix. Running short mid-lamination and scrambling to remix is one of the fastest ways to introduce a cold or ratio error into a fresh layup.
Humidity: The Problem That Hides Until the Next Coat
Relative humidity above 85% causes amine blush, a waxy, sometimes cloudy film that forms on the surface of a curing epoxy coat. It is a byproduct of the amine hardener reacting with moisture and CO2 in the air rather than with the resin. Amine blush itself does not ruin the structural cure of that layer, but it creates a barrier that prevents adhesion of subsequent coats, paint, or fairing compound.
How to Identify Amine Blush
Run a clean finger across the cured surface. A slippery or waxy feel is blush. A faint milky appearance in the surface is blush. If the surface sands to a white powder easily but feels greasy, that is blush.
Removing Amine Blush
- Wash with clean fresh water and a Scotch-Brite pad
- Wipe dry with clean paper towels (not a shop rag that may carry solvent contamination)
- Allow to dry fully, at least 30 minutes in dry air
- Then scuff with 80-grit and proceed with your next coat
Do not sand a blushed surface dry. You will just grind the waxy film into the abrasive and smear it across the surface.
Timing Your Work Around Humidity
In coastal environments, relative humidity typically peaks just before dawn and in the early evening. The driest window is usually 10 AM to 3 PM. For large lamination jobs, start application mid-morning and aim to have your final coat down before 2 PM so initial cure happens during the low-humidity window.
For penetrating rot repair, humidity matters even more because you are working with an already-compromised substrate. The BoatLife Git Rot Epoxy Kit is a two-part liquid penetrating system specifically designed to consolidate dry-rotted wood fibers without requiring their removal. It wicks into degraded grain by capillary action, so the substrate temperature and ambient humidity both affect how deeply it penetrates before it gels. Apply Git Rot on warm, dry days for maximum penetration depth.
Monitoring Conditions: Tools Worth Having
A digital combination thermometer and hygrometer costs under $20 and removes all the guesswork. Mount one at the work surface level, not at eye level or near the ceiling where readings will be warmer and drier than the actual substrate. Take readings at the surface of what you are bonding to, not the air two feet away.
Keep a simple project log: date, time, ambient temperature, surface temperature, relative humidity, resin and hardener used, mix ratio, pot life observed, and cure time to tack-free. After a season of notes you will have a reliable reference for your specific climate and materials.
Troubleshooting Environmental Problems
Epoxy Kicking Too Fast
Move the mixed batch immediately from a round pot to a flat roller tray. Spreading the mass reduces the exothermic pile-up. Work faster, apply thinner coats, and switch to a slow hardener for the next batch. If ambient is above 90°F, stop and resume in cooler conditions.
Epoxy Not Curing After 24 Hours
First confirm your mix ratio was correct. An off-ratio mix in either direction produces an undercured result regardless of temperature. If the ratio was right, the problem is almost certainly temperature. Apply gentle heat (a heat gun on low setting held 12 inches away, moving constantly) to warm the surface to 80°F to 85°F and hold it there for two to three hours. Check for tack after that period. If it firms up, continue curing under heat. If it stays soft after heat application, the batch has a ratio problem and needs to be removed.
Bubbles in the Cured Surface
Micro-bubbles in a cured laminate almost always come from one of three causes: resin applied too cold (air came out of solution as the resin warmed), surface too warm (outgassing from a substrate heated by direct sun), or hardener added to a resin that was not at equilibrium temperature. Applying epoxy to a sun-heated hull surface is a common mistake. The substrate can be 110°F even when the air is 80°F. Apply epoxy in the shade or after the surface has cooled.
Frequently Asked Questions
What is the ideal temperature range for working with marine epoxy?
Most marine epoxies perform best between 70°F and 85°F (21°C to 29°C). In that window you get predictable working time and full strength. Run hotter and the resin thickens fast in the pot, traps bubbles, and wets out cloth poorly. Run too cold and the exothermic reaction slows. Plan your layup for that band whenever possible.
How cold is too cold to apply epoxy on a boat repair?
Most marine epoxies should not go on below 55°F (13°C). Below that threshold the resin may never fully cure and you are left with a soft, tacky surface that will not protect the substrate. Below 65°F (18°C) the resin thickens and mixes poorly, so warm the resin and hardener to around 70°F to 75°F before mixing, and heat the workspace and substrate if you must work in the cold.
What causes amine blush on cured epoxy and how do I remove it?
Amine blush is a waxy film that forms when relative humidity exceeds 85% and moisture interferes with the surface cure. It blocks adhesion of paint or any subsequent coat. Wash the cured surface with clean fresh water and a Scotch-Brite pad, wipe dry with clean paper towels, allow 30 minutes to dry, then scuff with 80-grit before recoating. Working during the driest part of the day helps you avoid it in the first place.
Should I use a fast or slow hardener for a large layup in warm conditions?
Use the slow hardener in warm conditions. Above 80°F a fast hardener will kick before you finish wetting out a large laminate. The Boat Suppliers Slow Epoxy Hardener at a 2:1 ratio gives you the open time you need for complex or large layups. Reserve the fast hardener for cool conditions or small, quick repairs.
My epoxy is still sticky after 24 hours. How do I fix it?
A tacky surface usually means an incomplete cure from cold temperatures or an off-ratio mix. If the ratio was correct and temperature is the culprit, apply gentle heat with a heat gun on low held 12 inches away, moving constantly, to bring the surface to 80°F to 85°F for two to three hours. If it firms up, you are good. If it stays soft after heat application, the layer has a ratio problem and needs to be removed before you proceed.
What is the difference between the thin and thick epoxy kits for marine repair?
Thin epoxy flows freely and wets out fiberglass cloth quickly, making it the right choice for lamination and coating. Thick epoxy is a no-sag formula designed for bonding, gap-filling, and coating vertical surfaces where you need the material to stay put before it gels. They use different mix ratios so check the label before you start.
What You Need For This Job
- Boat Suppliers Thin Epoxy Resin Kit: lamination and coating resin with syrup viscosity for fast cloth wet-out
- Boat Suppliers Thick Epoxy Resin Kit: no-sag bonding and coating formula for vertical surfaces and gap-filling
- Fast Epoxy Hardener (4:1): cold-weather cure acceleration for small repairs below 70°F
- Slow Epoxy Hardener (2:1): extended working time for large layups and hot-weather conditions
- BoatLife Git Rot Epoxy Kit: penetrating two-part consolidant for rot-damaged wood substrate
Prev post

How to Sand Fiberglass to a Mirror-Smooth Finish: Complete Guide to Sanding Fiberglass Like a Pro
Updated on 07 April 2026
Next post

Woven Roving Fiberglass Weight Guide: Choosing the Right Thickness for Boat Building
Updated on 06 April 2026