

Keel & Strake Repair Kit for Fiberglass Boats - 10 Yards 1708 Tape + Epoxy
Keel & Strake Repair Kit for Fiberglass Boats - 10 Yards 1708 Tape + Epoxy
Share
SKU:SK-SKF001
Couldn't load pickup availability
A keel and strake repair kit for small fiberglass boats: skiffs, square-stern canoes and other hulls with keels and strakes worn through to raw glass, cracks along the bottom, or chine damage. Ten yards of 1708 tape rebuilds the wear strips, and epoxy grips the old polyester laminate far better than more polyester would.
What is in the kit:
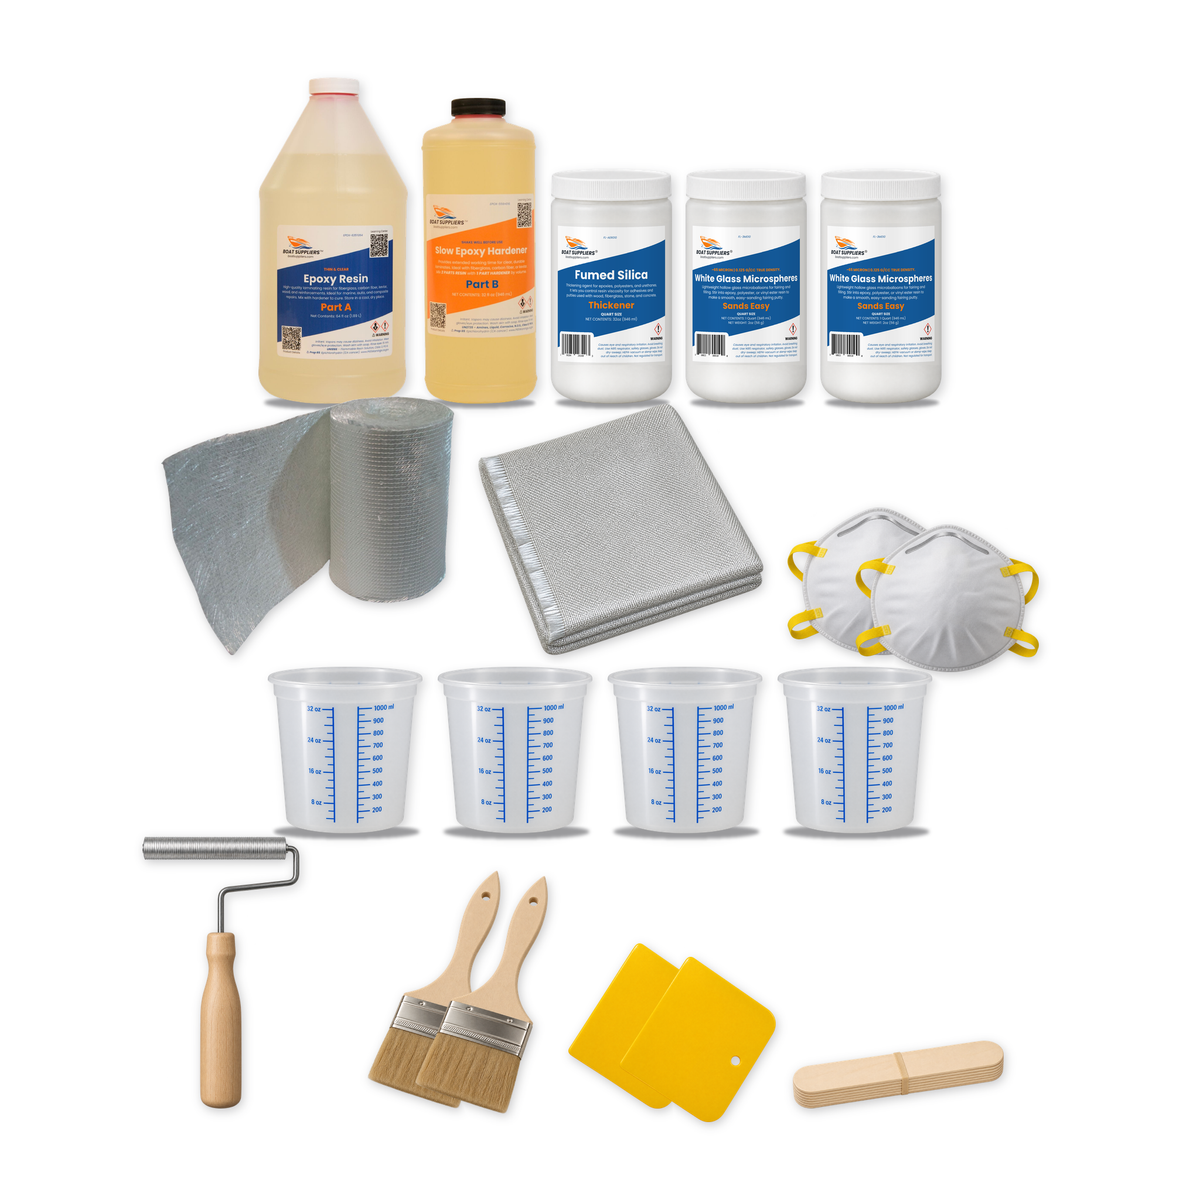
- 96 oz two-part epoxy kit: 64 oz thin clear resin plus 32 oz slow hardener, mixed 2 parts resin to 1 part hardener by volume
- 10 yards of 6" stitched 1708 fiberglass tape for keels, strakes, chines and long cracks
- 1 yard x 38" of 6 oz woven fiberglass cloth for hole patches and a finish layer over the worst runs
- 1 quart fumed silica thickener for structural putty in gouges and gaps
- 2 quarts white glass microspheres (glass bubbles) for a light fairing putty that sands easily
- Aluminum laminating roller, 1/2" x 4", to drive air out of the tape
- 2 chip brushes, 2 plastic spreaders, 4 graduated quart mixing tubs, wood stir sticks
- 2 N95 dust masks for grinding and sanding
You supply: nitrile gloves, a grinder or sander with 36 to 80 grit, sandpaper for fairing, acetone or denatured alcohol, and paint for the bottom.
How the repair works: strip loose paint and grind each damaged run back to clean glass. Fill deep gouges with silica-thickened epoxy, then lay 1708 tape along the keel or strake, wet it out and roll it down. Use two layers where the hull is worn through or cracked. Finish the keel or strake line itself with silica-thickened epoxy, which cures hard and takes wear, fair the flanks and tape edges with glass bubble putty, then sand and paint.
Coverage: 30 feet of 6" tape. That is about two layers down a 7 foot keel plus a single layer on two more 8 foot strakes, with epoxy left over for filling and fairing.
Finish with paint, not gelcoat: epoxy has no UV resistance on its own and gelcoat does not cure reliably over it, so prime and paint the repair.
Working time: 35 to 40 minutes of pot life at 80F with the slow hardener, long enough to wet out a full-length run of tape. Work at 70F or warmer; cooler than that, the cure can take 2 to 3 days.
For fiberglass hulls. Not for aluminum or polyethylene boats. A smaller patch on a kayak or canoe only needs the Kayak & Canoe Repair Kit; a soft transom is a core job for the Transom Repair Kit; and a wide area rather than a long narrow run wants the 50 inch wide 1708 in the 1708 Fiberglass Repair Kit.
Ships UPS or FedEx Ground to the lower 48. The fabric and the epoxy resin are not regulated for transport; the hardener bottle is a limited quantity corrosive, so the kit travels by ground and cannot go by air.
Specifications
How to use this kit
Epoxy and 1708 tape for worn keels, strakes and cracked bottoms. Every kit ships with this same sheet printed and in the box.
What is in the kit
- 96 oz Two-part epoxy kit64 oz resin plus 32 oz slow hardener, 2:1 by volume
- 10 yd 6 in stitched 1708 fiberglass tapekeels, strakes, chines and long cracks
- 1 yd 6 oz woven fiberglass cloth, 38 in widehole patches and a finish layer over the worst runs
- 1 qt Fumed silica thickenerstructural putty for gouges and gaps
- 2 qt White glass microspheres (glass bubbles)two quart jars, light fairing putty that sands easily
- 1 Aluminum laminating roller, 1/2 x 4 indrives air out of the tape
- 2 / 4 Chip brushes, graduated quart mixing tubs
- 2 / 1 pk Plastic spreaders, wood stir sticks
- 2 N95 dust masksfor grinding and sanding
You supply: nitrile gloves, a grinder or sander with 36 to 80 grit, sandpaper for fairing (120 to 220), denatured alcohol or acetone, plastic sheet and tape to back a hole, and bottom paint or primer and topcoat.
Mixing epoxy (2:1 by volume)
| Ratio | 2 parts resin to 1 part hardener |
| One yard of tape | about 4 oz resin + 2 oz hardener |
| Full kit | 64 oz resin + 32 oz hardener |
Measure by volume in the graduated tubs. Off-ratio epoxy does not cure slow, it never fully cures. Confirm the ratio printed on your hardener bottle.
Stir 2 minutes scraping sides and bottom. Mix small batches: a full tub of mixed epoxy heats up and kicks early.
The job, start to finish
Strip and grind to clean glass
Flip the hull and take every repair area back to sound material: all loose paint off, then grind the worn strakes and cracks to clean, bright laminate with 36 to 80 grit and feather the edges a few inches either side. Epoxy will not hold over old paint. Wipe with alcohol and let it flash off.
Fill the gouges
Brush a thin coat of mixed epoxy onto the bare glass, then thicken a batch with fumed silica to a peanut butter consistency and press it into the deep gouges so the tape has a smooth surface to lie on. Do not wait for it to cure: lay the tape over it while it is still soft.
Tape the strakes
Cut the 1708 tape to length and lay it mat side down along the keel or strake. Wet it out with the brush until it goes clear, then work it down with the roller so it follows the ridge without bridging. On worn-through or cracked sections add a second layer while the first is still tacky, 2 in shorter at each end.
Patch holes with cloth
For a hole or a through-crack, tape plastic sheet behind it, then lay cloth patches in increasing sizes with tape over the top. A layer of cloth over the tape also gives a smoother surface to fair. Let it cure a full day at 80 F before sanding; allow 2 days at 70 F.
Fair and paint
Wash the cured epoxy with warm soapy water and scuff it. On the keel or strake line itself, which drags on sand and ramps, trowel on epoxy thickened with fumed silica: it cures hard and takes wear. On the flanks and tape edges, use epoxy thickened with glass bubbles to a peanut butter consistency, slightly proud, and once cured sand fair with 120 to 220. Epoxy has no UV resistance on its own, so prime and paint the bottom. Do not gelcoat over epoxy.
If something goes wrong
Soft or greasy spots
Off-ratio or under-stirred epoxy. Scrape it out, wash with soap and water, and redo.
Cloudy or sticky surface
Moisture got on it before it cured. Wash with warm water and scuff. If it stays tacky, sand or scrape it off and recoat.
Tape edge lifted
Not ground far enough out, or paint left under it. Grind wider and wipe with alcohol.
Still soft after a day
Under 70 F the slow hardener can take 2 to 3 days. Warm the space, do not add more hardener.
Tape bridges the ridge
Too dry or not rolled. Add epoxy and roll from the centre of the ridge outward.
Epoxy needs paint over it for UV. Rotten transom or soft floor? That is a core job: see the Transom Repair Kit at boatsuppliers.com.
Blog posts

1708 vs 1808 Biaxial Fiberglass: Which Weight...
1708 vs 1808 Biaxial Fiberglass: Which Weight...

PVA vs Wax vs Semi-Permanent Mold Release: Wh...
PVA vs Wax vs Semi-Permanent Mold Release: Wh...
