The Complete Fiberglass Roller Guide: Choosing the Right Type for Your Marine Project

21 May 2026
The wrong fiberglass roller does not just slow you down. It leaves air voids, uneven resin distribution, and missed corners that show up as delamination six months later. The right roller for the job is a decision you make before you crack open a can of resin, not after the cloth starts gelling.
This guide breaks down every roller type by what it actually does, where it belongs in a lamination sequence, and which specific product to reach for. Whether you are patching a small blister or laminating a full hull section, the spec that matters is matching roller geometry to your geometry.
Rollers and tools featured in this guide
What a Fiberglass Laminating Roller Actually Does
A fiberglass laminating roller has one job: consolidate the layup. That means pressing cloth down into wet resin to drive out trapped air, close dry spots, and lock each ply flat before the next one goes on. Without mechanical consolidation, even properly mixed resin at the right ratio will leave voids that measurably reduce laminate strength. The structural consequence of excessive void content is not cosmetic. It is delamination under load.
The roller does not apply resin. You wet the surface with a brush or squeegee first, lay the cloth, then use the roller to work out air systematically. The technique matters as much as the tool: start at the center, work outward in overlapping passes, and use moderate downward pressure rather than aggressive scrubbing. Too much force pushes resin out of the cloth. Too little leaves air pockets at the fiber intersections.
All quality laminating rollers use aluminum cores. Aluminum resists polyester, vinylester, and epoxy resins without softening or contaminating the laminate. Plastic cores swell and dissolve in styrene-based resins. If a roller core is not aluminum, it does not belong in a marine layup.
Economy Rollers: The Right Call for Occasional Repairs
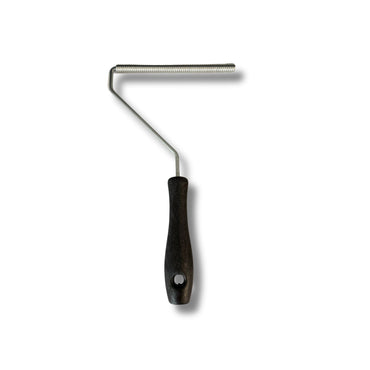
For small patches, blister repairs, and infrequent gelcoat work, the Economy Fiberglass Roller is the correct tool. Its all-aluminum head handles the chemical exposure of polyester and epoxy resins without degrading, and the cost makes disposal after a one-session repair more practical than solvent cleaning.
The trade-off versus premium rollers is cycle life, not performance on a single job. An economy roller wets out cloth and removes air bubbles just as effectively on the first pass. Where it falls behind is surviving 10 or 15 aggressive cleaning sessions with acetone. For repairs measured in square feet, not square yards, that durability gap is irrelevant.
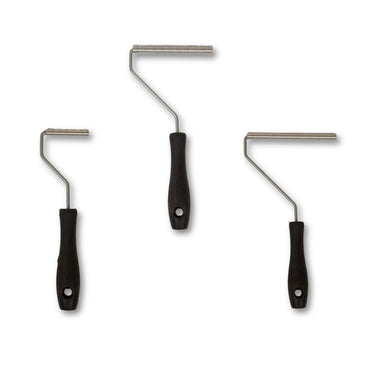
If you are running multiple repair sessions back to back, or if you want a clean roller available at every stage of a multi-day layup, the Economy Fiberglass Roller - 3 Pack solves that problem directly. Three rollers let you start each session with an uncontaminated tool without waiting for a cleaned roller to fully dry. Fast-setting resins with pot lives under 20 minutes make this a real operational advantage.
When Economy Rollers Are the Right Choice
- Single-use blister or osmotic repair patches
- Gelcoat touch-up work where roller contact time is short
- Learning lamination technique before investing in premium tools
- Jobs where disposal is cleaner and faster than solvent cleanup
- Backup rollers on large jobs where a primary roller gets contaminated mid-session
Detail Rollers: Professional-Grade for Structural Work
When the laminate you are building carries structural load or when you are repeating the same layup process across multiple sessions, step up to the Fiberglass Detail Roller. The high-quality all-aluminum head is machined to tighter tolerances than economy versions, which means it holds its shape and rolls true even after repeated acetone cleaning cycles.
The feature that separates detail rollers from economy options in daily shop use is the threaded handle. That thread accepts standard extension poles, which changes the ergonomics of working on hull sides, overhead cabin liners, and deep bilge areas. Reaching overhead with a short-handled roller kills your technique because you cannot maintain consistent downward pressure. An extension pole restores that control.
For any project covering more than a few square feet of structural laminate, or any repair where you expect to clean and reuse the roller across multiple days, the Fiberglass Detail Roller Kit - 3 Pack gives you the right combination of quality and redundancy. Three detail rollers cover a full hull section layup, with one roller per resin batch, so you are never waiting on cleanup mid-lamination.
Use the resin calculator to estimate how much resin a given layup requires before you start. Knowing your batch size in advance tells you how many rollers you will actually cycle through in a session.
When Detail Rollers Are the Right Choice
- Structural hull repairs involving multiple plies of 1708 biaxial or woven roving
- Full transom rebuilds where laminate thickness exceeds 3/8 inch
- Overhead or vertical surface work requiring extension pole attachment
- Production work or repeated repairs where tool cost amortizes over many sessions
- Any job where laminate quality directly affects vessel safety
Corner Rollers: The Tool Most Builders Forget Until They Need It
Air does not accumulate randomly in a fiberglass layup. It accumulates in corners, and corners are exactly where structural failures start. The Fiberglass Corner Roller exists to solve this specific problem.
A standard cylindrical roller cannot press cloth into a 90-degree angle or a tight radius. When you try, it bridges the corner, leaving a pocket of dry cloth or trapped air underneath. The corner roller's geometry conforms to inside angles, applying pressure directly into the joint rather than across it. That contact is what creates a proper fillet bond rather than a bridged, air-filled void.
In a boat, the critical corners are not rare features. They are everywhere:
- Hull-to-deck joints where the two major structural elements connect
- Bulkhead tabbing where vertical panels bond to the hull shell
- Stringer-to-hull joints along the full length of the bottom
- Transom-to-hull corners at the stern
- Interior berth and locker corners in foam-cored structures
Delaminated bulkhead tabbing is one of the most common structural defects surveyors find in used boats, and inadequate corner consolidation is a primary cause. Any fabricator building or repairing a boat with interior structure needs a corner roller in the tool kit. Add one to your order before you start the job, not after you find the bridged void on inspection.
For corners and structural joints
Radius Rollers: Maintaining Contact on Curved Surfaces
A standard flat-faced cylindrical roller loses contact with the laminate wherever a surface curves away from it. On compound curves like a bow flare, a bilge radius, or a hull-to-keel fillet, that loss of contact creates the same problem as a missed corner: trapped air and dry cloth that looks wet from the surface but is not bonded underneath.
The Fiberglass Radius Roller is profiled to follow curved geometry. The roller face conforms to the surface rather than bridging across it, maintaining consistent pressure through the full stroke on rounded transitions. Use it anywhere a flat roller would rock or skip: bilge radiuses, rounded deck edges, curved hull sections, and any molded transition that is not a flat plane. If you are doing structural laminating on anything other than a dead-flat surface, a radius roller belongs in the kit alongside your standard cylindrical options.
Roller Width: Matching Size to the Job
Roller width is the second specification to nail after roller type. The principle is straightforward: narrow rollers give control, wide rollers give efficiency.
2 to 3 inch rollers are the right choice for detail work, narrow stringers, small repair patches, and anywhere the roller needs to fit between adjacent structures. A 3-inch roller on a 6-inch patch gives you precise edge control without running off the cloth boundary.
4 to 6 inch rollers cover large flat areas efficiently. On a hull lamination covering several square yards, a wider roller maintains consistent pressure across the full stroke width, reducing the number of passes needed and the time the resin spends open before the next ply goes on.
For most boat repair work, a 3-inch detail roller handles 80 percent of situations. Add a corner roller for the structural joints, a radius roller for curved surfaces, and a wider option for any large flat areas, and you have a complete roller kit for serious repair work.
Cleaning and Maintaining Fiberglass Rollers
Roller maintenance determines whether a premium tool survives 30 sessions or 3. The rule is simple: clean immediately after use, before the resin gels. Once resin kicks, you are replacing the roller rather than cleaning it.
For polyester and vinylester resins: flush with acetone, working the roller against a clean rag to pull resin out of the core. Two or three flushes until the acetone runs clear is the standard. Let the roller dry completely in open air before storage.
For epoxy resins: use denatured alcohol or a dedicated epoxy solvent. Acetone works but evaporates faster than denatured alcohol, which gives you slightly more working time during cleanup. Never use water on a fresh epoxy roller; it does not dissolve uncured epoxy and causes blushing if residue contacts subsequent coats.
Store clean rollers in a sealed bag or container to keep shop dust off the aluminum surface. In a marine environment, even aluminum benefits from being kept away from salt air when not in use. Inspect roller cores before each session; a bent or out-of-round roller applies uneven pressure that shows up as streaky consolidation in the finished laminate.
Frequently Asked Questions
What does a fiberglass laminating roller actually do?
A laminating roller consolidates the layup, pressing resin and cloth together to drive out trapped air and ensure the cloth fully wets out. That gives you a strong, void-free composite instead of bubbles and weak spots. Excessive void content measurably reduces laminate strength and is a primary driver of in-service delamination, which is why mechanical consolidation with a roller is not optional on any structural repair. Quality rollers use aluminum cores that resist polyester and epoxy resins without softening or contaminating the laminate.
Which roller should I use to wet out tight corners and hull-to-deck joints?
Reach for the Fiberglass Corner Roller. Its geometry is shaped to press resin into sharp angles and tight joints where air bubbles commonly get trapped and a standard cylindrical roller bridges across instead of pressing in. It is the right tool for hull-to-deck joints, bulkhead tabbing, stringer-to-hull connections, and transom corners, where proper saturation directly affects the structural integrity of the repair.
How do I clean a fiberglass roller after a layup?
Clean immediately after use, before the resin kicks. Use acetone for polyester and vinylester resins; use denatured alcohol for epoxy systems. Work the roller against a clean rag through two or three solvent flushes until the solvent runs clear, then let the roller dry fully in open air before storage. Replace roller covers once they harden, go out of round, or pick up contamination. Even a premium all-aluminum roller gives uneven consolidation if the core is bent or worn.
Do I need a detail roller or will an economy roller work?
Economy rollers are the right call for one-time fixes: small gelcoat repairs, occasional patches, and situations where replacing the roller costs less than cleaning it. Use the Fiberglass Detail Roller on any structural or multi-session job. The precision-machined aluminum head survives repeated cleaning cycles without going out of round, and the threaded handle accepts an extension pole for hull sides, overhead work, and engine compartments where short-handle technique breaks down. If the laminate carries load or the job runs more than one day, use the detail roller.
What roller width should I pick for my project?
Width follows the job. Narrow rollers at 2 to 3 inches give precise control for detail work, small patches, and tight spaces between structural members. Wider rollers at 4 to 6 inches cover large flat surfaces like hull sections more efficiently and maintain consistent pressure across each stroke, which matters when resin is gelling and you need to close the surface fast. For hard-to-reach spots, choose an extension-compatible model so technique does not suffer with reach.
How many rollers do I need for a multi-ply lamination job?
Plan on one roller per resin batch as a baseline. If you are applying 3 plies of 1708 biaxial with separate resin mixes, have 3 rollers staged and ready. Fast-setting resins with pot lives under 20 minutes leave no time for mid-job cleanup. The Fiberglass Detail Roller Kit - 3 Pack and the Economy Fiberglass Roller - 3 Pack are both sized around this operational reality. Use the resin calculator to estimate batch count before you start.
What You Need For This Job
- Fiberglass Detail Roller: primary laminating roller for structural repairs and multi-session work
- Fiberglass Detail Roller Kit - 3 Pack: three premium rollers for multi-ply laminations without mid-job cleanup delays
- Economy Fiberglass Roller: cost-effective single-use option for small patches and occasional repairs
- Economy Fiberglass Roller - 3 Pack: three economy rollers staged for back-to-back repair sessions
- Fiberglass Corner Roller: consolidates resin in hull-to-deck joints, bulkhead tabbing, and all structural inside corners
- Fiberglass Radius Roller: conforms to curved surfaces and radiused transitions where flat rollers lose contact
Prev post

Fiberglass Cloth vs Tape: Complete Guide for Marine Repairs and Reinforcement
Updated on 08 June 2026